Run a more efficient, profitable business
Managing Business Operations is the last course in the programme and the one that keeps everything else moving. It covers Contact Manager, tagging your itineraries, and Trip Pipeline, the tools that keep traveller information connected and every live trip visible from enquiry through to travel. To earn your badge, pass the assessment with 80% or higher.
By the end of this course, you will be able to:
Create and manage contact records, and bulk import an existing client list.
Tag itineraries so they can be filtered and found again quickly.
Understand what Trip Pipeline is and how it differs from an itinerary.
Move trips through pipeline statuses and read a trip card's indicators.
Search, filter and prioritise your pipeline at the start of a working day.
Use tasks and automations to keep follow-ups from relying on memory.
Why this course matters
An itinerary does not end once it is sent. Managing Business Operations is where you keep track of who your travellers are, organise your work so it can be found again, and make sure no live trip falls through the cracks between enquiry and departure.
How to work through this course
The course is split into topics, and every topic covers one specific part of Wetu. For each topic, follow these steps in order:
Open Wetu in a split screen and work side by side in the software as you go.
Applying each topic as you learn it is what makes it stick.
Time to get serious
We've laid the topics out in a logical sequence to match how you'd naturally move through Wetu, but jump ahead or double back whenever it's useful to you.
Topic Quick Links
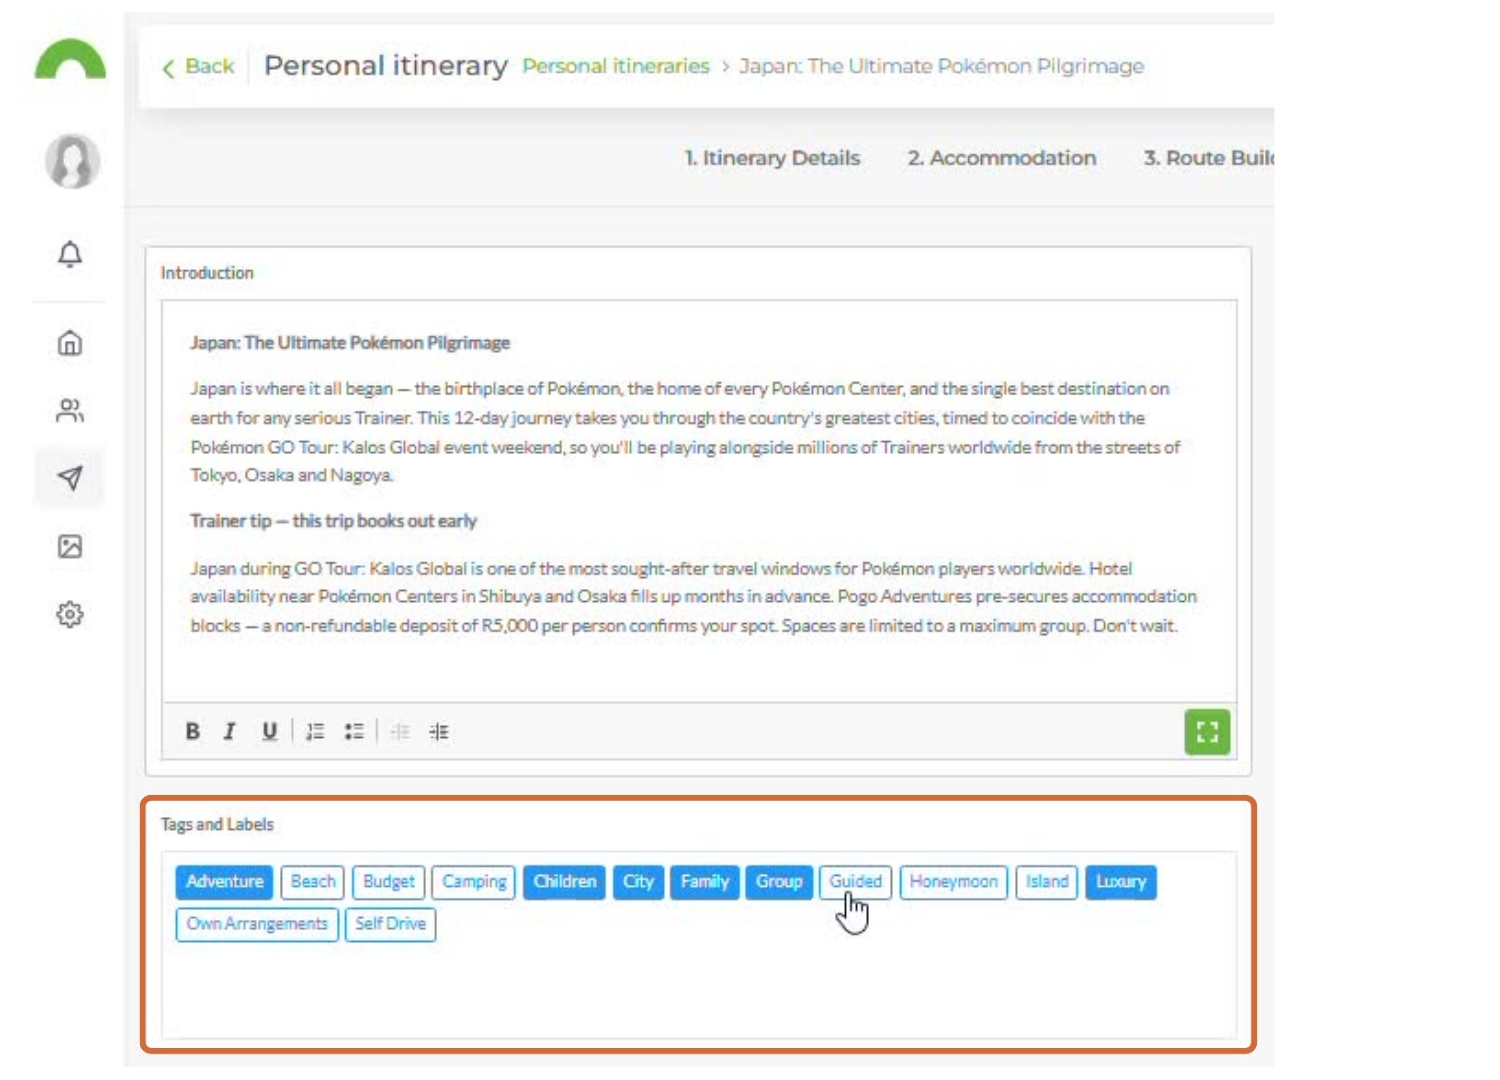
Use an internal filing system to filter and find itineraries by meaningful business categories. .
A big account without tags is just a very long scroll. This topic shows you how to add tags and labels to an itinerary, your own internal filing system, so you can sort by destination, trip type or client segment without ever hunting through a list by memory. Build the habit early, and a growing account stays searchable instead of becoming a guessing game.
Try it: Apply two tags that would genuinely help your team find the itinerary later.
Pre-build a day of activities once, then drop it into any itinerary without rebuilding it from scratch.
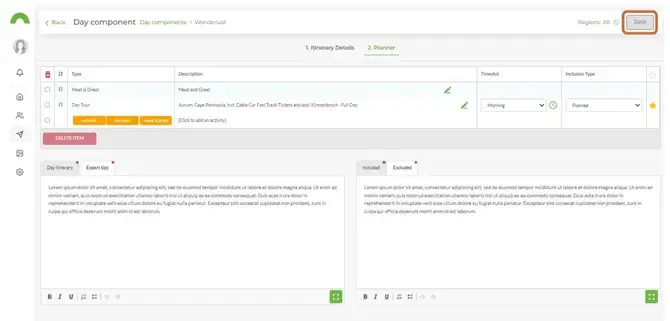
If you find yourself adding the same handful of activities to itinerary after itinerary, that's exactly what Day Components are for. This topic shows you how to pre-build a set of activities, day notes, expert tips, and inclusions once, then insert the whole thing into any itinerary in a single action. One thing worth knowing before you dive in: a Component can't be sent to a client directly, it only comes to life once it's added inside an itinerary through the Planner.
Try it: Build a simple Day Component with two activities and add it to your practice itinerary.
Bundle accommodation, routing and activities for a full multi-night stay so it drops into any itinerary in one move.
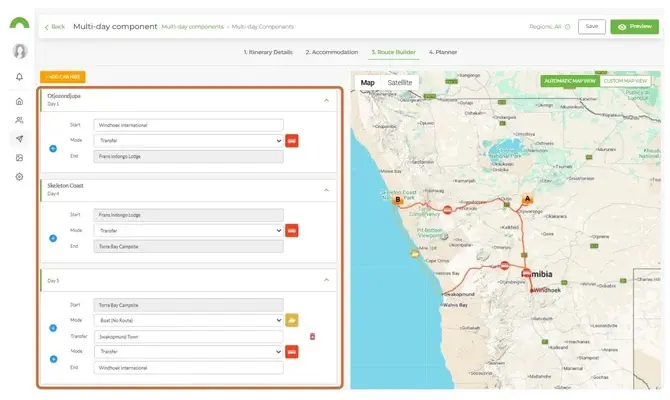
This is the bigger sibling of Day Components, built for when it's not just one day you reuse, but a whole multi-night leg, the accommodation, the route between it, and the activities for each day, all packaged together. This topic walks you through all four building blocks: itinerary details, accommodation, the route, and the planner. One tip worth carrying over from earlier in this course: tag your component as you build it, so it's easy to find and reuse the next time you need it.
Try it: Open Multi-Day Components and note what you'd need to pull together to build your own signature multi-night leg.
Turn one great itinerary into a template you can put in front of every enquiry that fits.
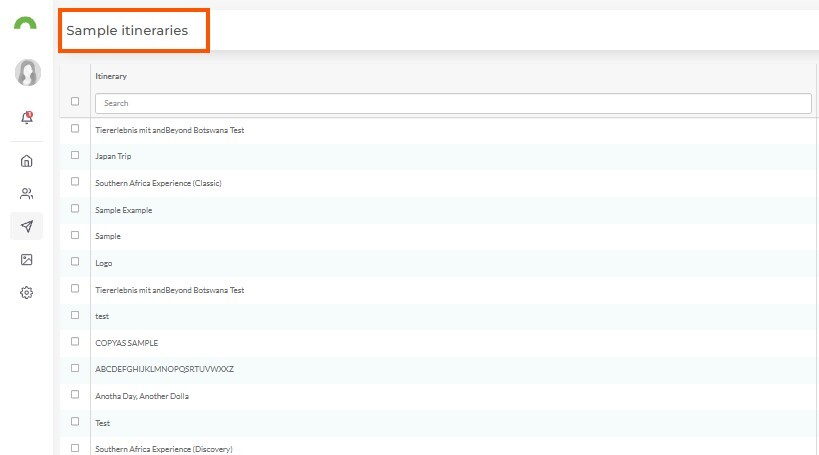
Not every trip you build needs a client's name attached to it yet. This topic shows you how to turn a great itinerary into a reusable standard package: no traveller, no dates, just the route, the content and the story, ready to share as a link, embed on your website, post out on social media, or group into a catalogue of your best offerings. Add Scheduled Departures and pricing, and it even earns its own Book Now button. The moment a real enquiry fits, one click turns it into that client's personal itinerary, and the original stays exactly as it was, ready to sell again.
Try it: Open the Itinerary Builder, find where these reusable templates live, and think of one route in your business that deserves on
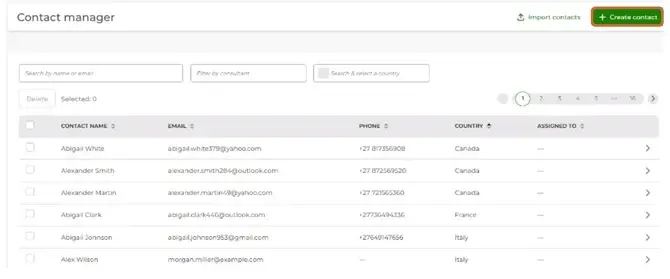
Every returning client shouldn't feel like a stranger. This topic shows you how to build a contact record in the Contact Manager, personal details, preferences, travel history, and every itinerary linked back to them, so the next trip you build starts with context instead of a blank page. Add contacts here before or alongside the itinerary itself, and anything you add during the build links straight back to the same record.
Try it: Create a fictional contact and link the practice itinerary.
Migrate existing client data without creating a duplicate or unreliable contact base.
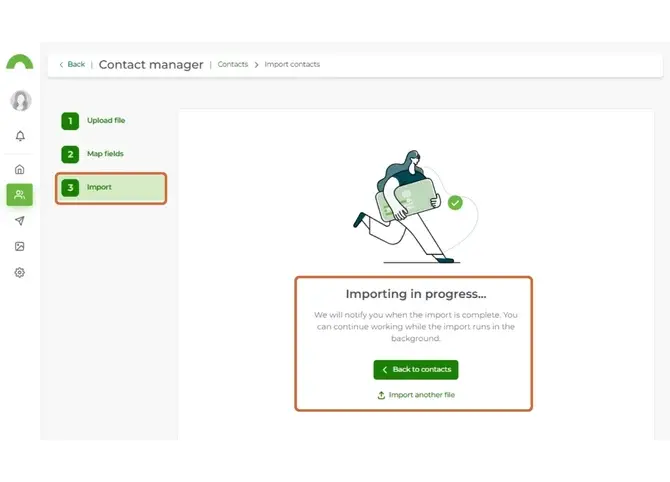
If you're already sitting on a client list, there's no reason to retype it one contact at a time. This topic shows you how to bulk import from a prepared spreadsheet, and just as importantly, how to map your fields correctly before you import, so you end up with one clean contact base instead of duplicates you'll be untangling for months.
Try it: Review the import template and identify the required fields.
Create a shared operational view from enquiry through to travel so the team knows what needs attention. Align statuses with your real operating process so teams use the same language and workflow.
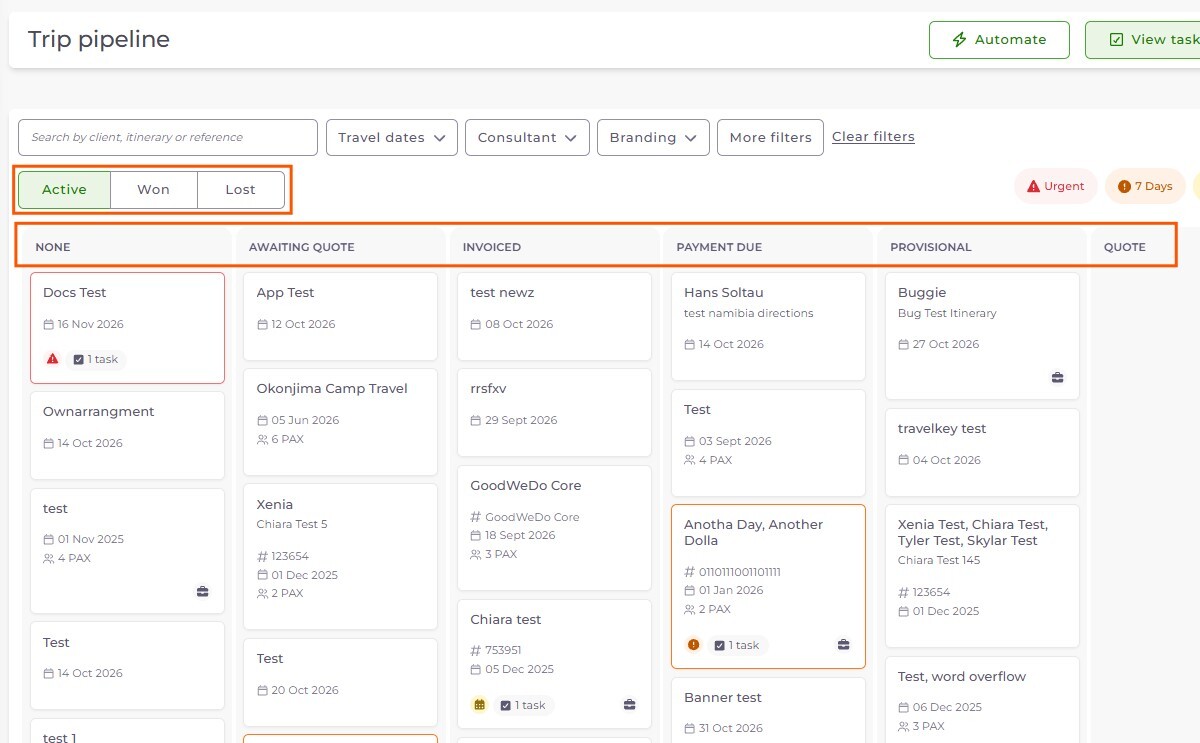
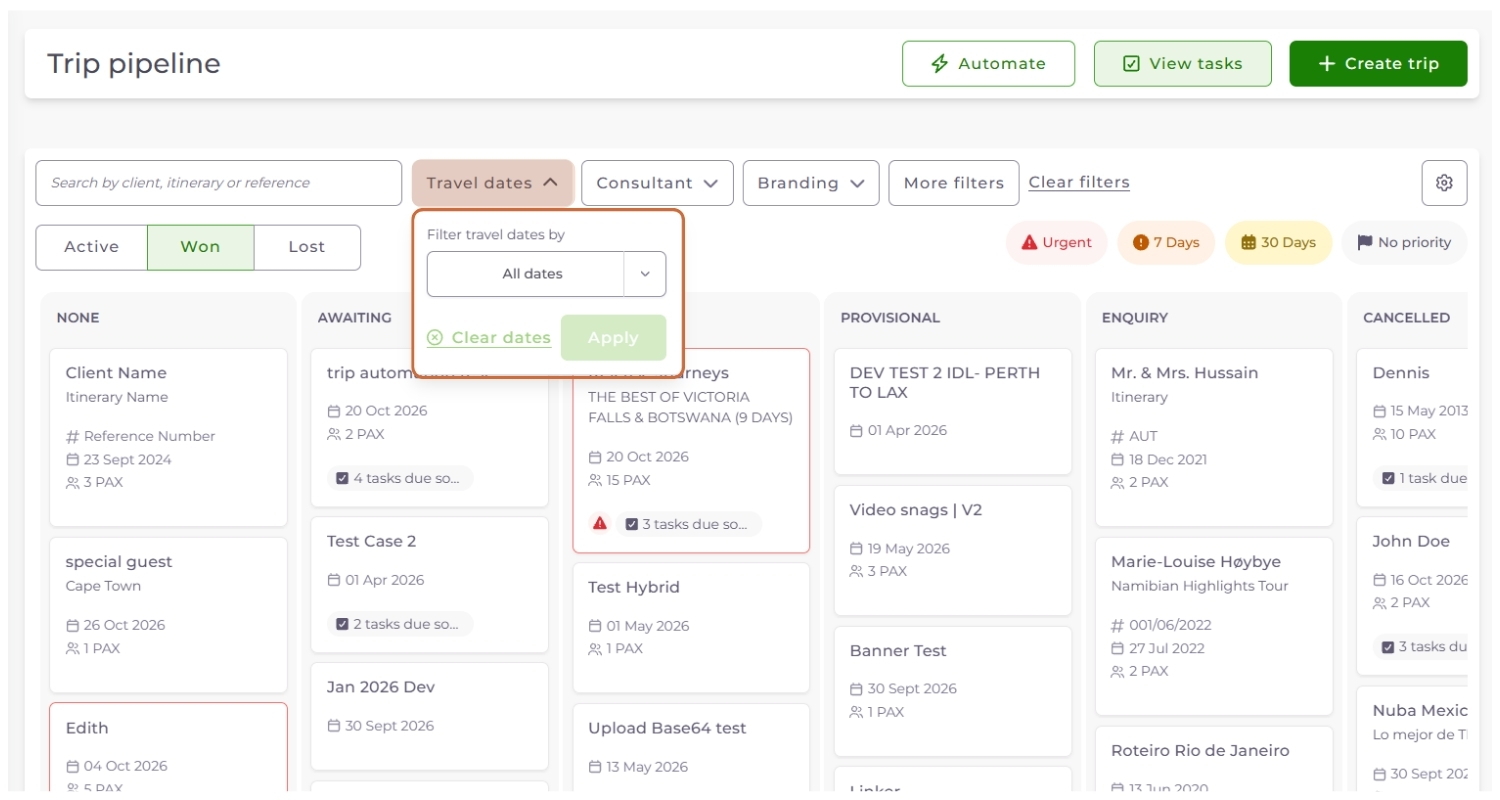
This topic covers Trip Pipeline, where you manage the work that moves a trip from first enquiry through to travel, and the statuses that organise it. An itinerary holds the travel experience, while Trip Pipeline shows every trip as a card on one board, so the team can see where each booking stands. The columns on the board are statuses. They're synced with the itinerary statuses in the Itinerary Browser, so a change in one shows in the other. From the Settings cog, Edit statuses lets you add, rename and reorder statuses, move them between the Active, Won and Lost categories, or delete them and choose where their trips move. An account can have up to 20 statuses, with at least one in each category, and nothing changes until you select Save. Trip Pipeline is available on Premium and Enterprise plans, but not on Lite. One thing worth doing early: set your statuses up before you start moving trips, because they're shared with the Itinerary Browser.
Try it: Open Trip Pipeline and identify how many trips sit in each status. Review the current statuses and compare them with how your business actually works.
Keep changing trip status visible to the whole team and surface overdue or urgent work. Give colleagues enough context to understand what has happened and what needs to happen next.
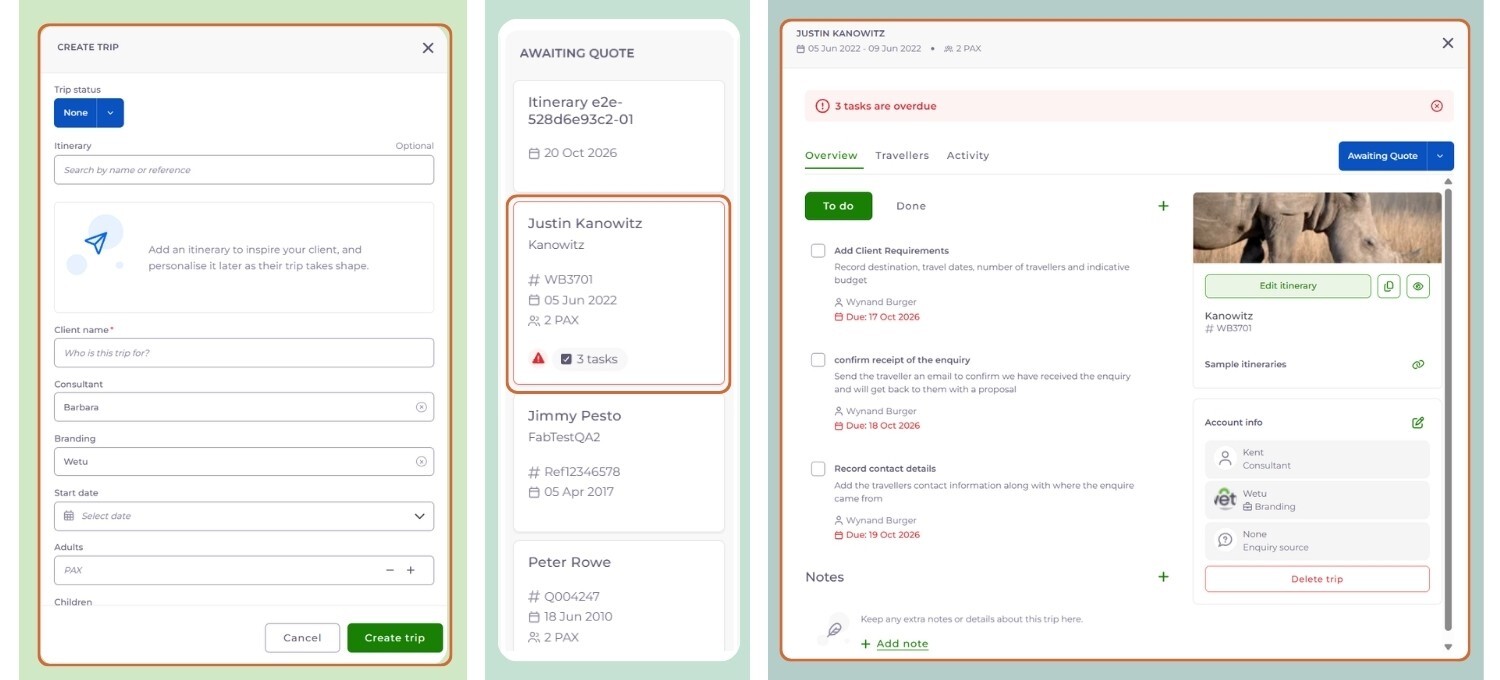
This topic covers reading a trip card, moving trips through your workflow and what you can see and manage inside the Trip Panel. Each trip card shows the client name, itinerary name, reference number, travel date and number of travellers, plus task and notification indicators. To update a trip's status, drag its card into another status column, and the change shows straight away for the whole team. Card colours show what needs attention: white means nothing is due soon, yellow means something is due within 30 days and orange within 7 days. Red means urgent: an automation runs tomorrow, or a task is due today or is overdue. Blue is for information only and shows that an automation will soon move the trip forward. Selecting a card opens the Trip Panel, where the Overview tab holds the trip's status, notifications, tasks, notes, itineraries, consultant and branding. Notes record preferences and handovers, and show the name of the consultant who added them. The Activity tab shows every change, who made it and when. One thing worth building into a habit: give your notes clear names, so a colleague can pick up the trip without having to ask.
Try it: Move a trip card to a different status and note the indicator. Open a trip panel and review linked itinerary, travellers, notes and activity timeline.

Use filters and priorities to narrow attention to the right trips instead of manually scanning everything.
This topic covers finding the trips that need you, using search, priority filters and the Filter panel. Search by client name, itinerary name or booking reference. The priority filters (Urgent, 7 Days, 30 Days and No Priority) show only the trips that match, and you can select more than one at a time. More filters opens the Filter panel, where you can combine trip category, trip priority, number of nights, PAX, consultant, branding and travel dates. The Travel dates filter in the filter bar finds trips by day, month or year, or trips with no dates yet. You can clear filters one at a time, or select Clear all to see every trip again. One thing worth building into a habit: start each day with the Urgent filter, and check No Priority regularly so no trip is overlooked.
Try it: Apply a priority filter plus one advanced filter.
Capture every enquiry as a trip the moment it arrives, and keep the itinerary options linked to the trip they belong to.
This topic covers creating a trip and linking the itineraries that belong to it. You can create a trip with just a client name, and add the status, itinerary, consultant, branding, travel dates and PAX now or later. Creating a new personal itinerary in Wetu also creates a matching trip, so every personal itinerary has a trip to manage. A trip links one personal itinerary and any number of sample itineraries, so you can compare options before copying one as personal. From the trip you can edit, preview, remove, disable or lock the personal itinerary, and preview or remove sample itineraries. Worth knowing: if a personal itinerary is already linked to another trip, Wetu stops you creating a duplicate and offers to open the existing trip instead.
Try it: Create a trip with only a client name. Link a sample itinerary, then select Copy as personal.
Keep every traveller's details, documents and needs with the trip so suppliers receive accurate information the first time.
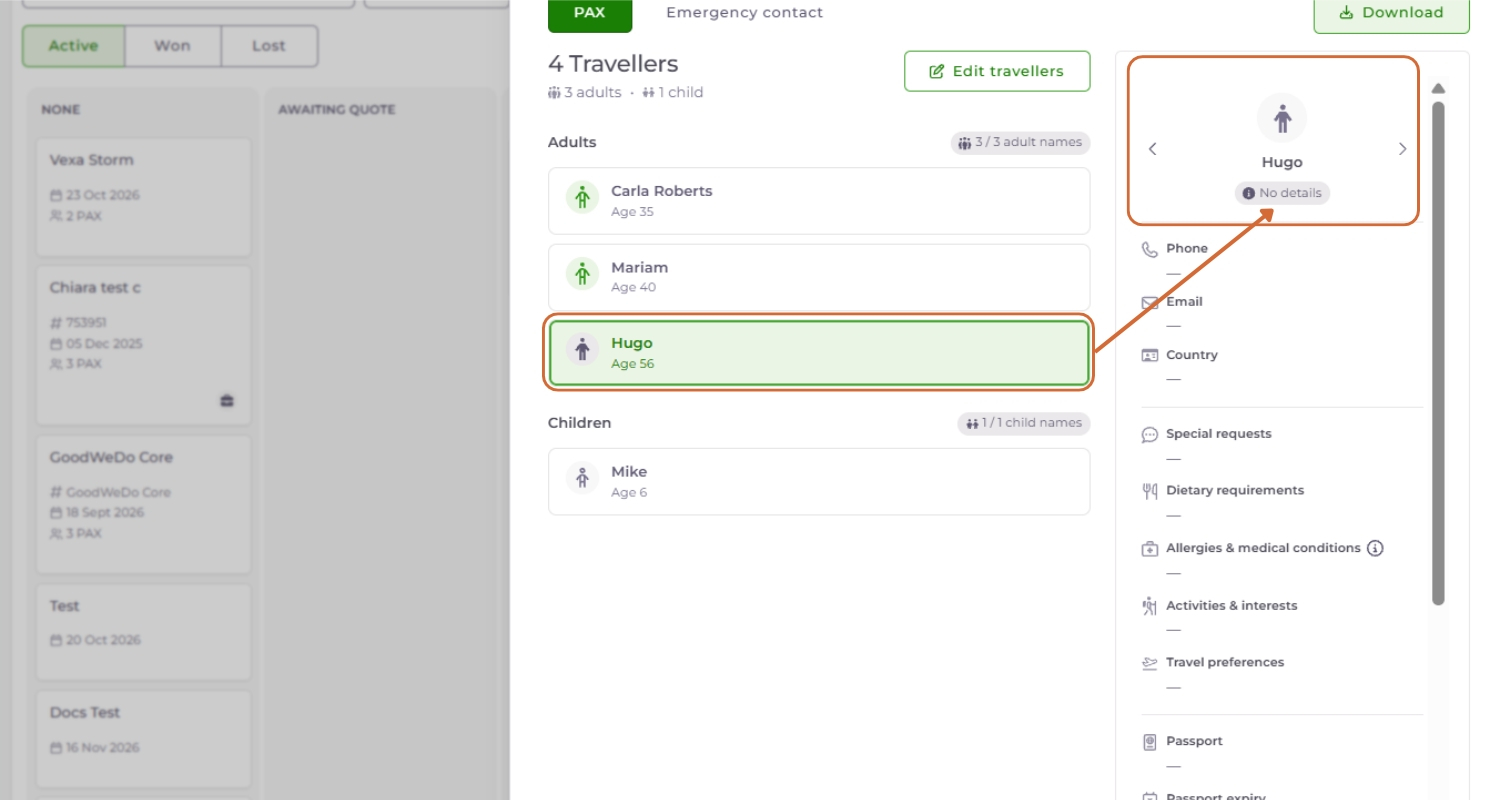
This topic covers the Travellers tab, which holds everyone on the trip. Set the number of adults and children, then link travellers from Contact Manager or add them as free text when no contact exists yet. Linked contacts show their contact details, travel documents and preferences, including allergies and medical conditions, and any updates made in Contact Manager carry through. You can save a free-text traveller as a contact at any time. You can also add an emergency contact, and download traveller details as CSV, PDF or Excel to share with suppliers. One thing worth building into a habit: capture passport and nationality details early, and add an emergency contact before travel.
Try it: Set the PAX count, link one Contact Manager contact and add one free-text traveller. Then download the traveller list.
Use tasks, reminders and automation to reduce missed follow-ups and repeatable admin.
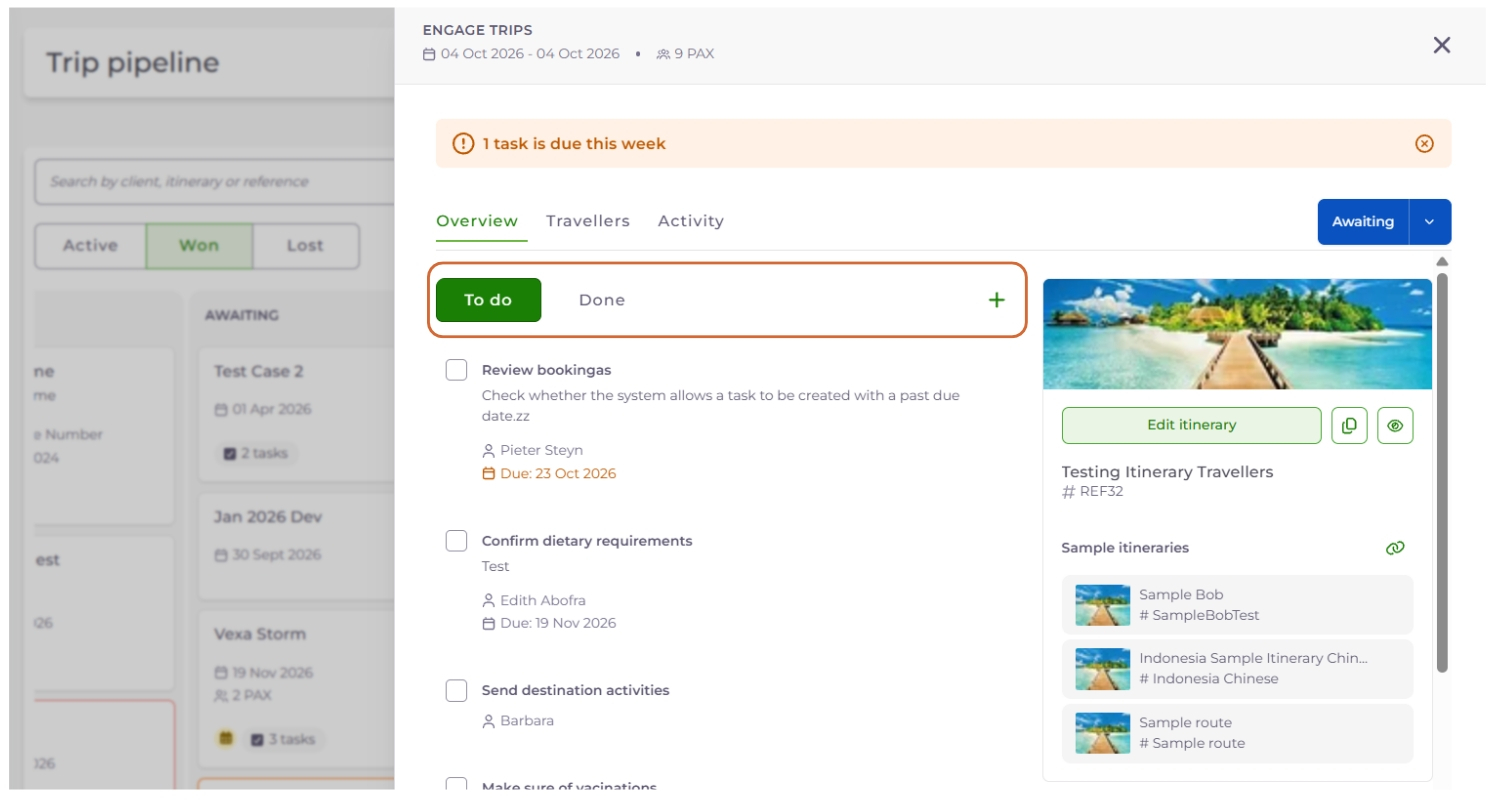
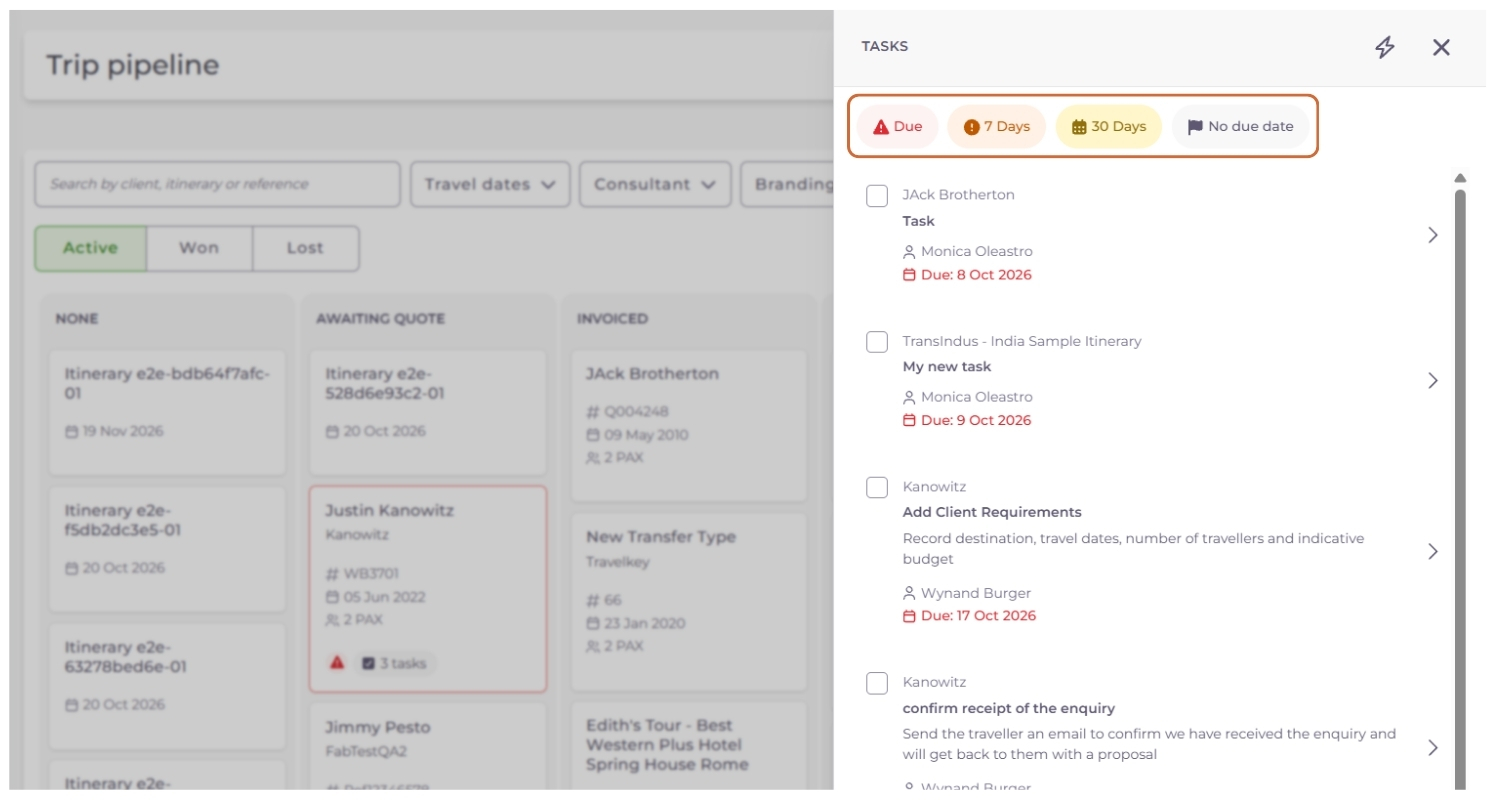
This topic covers tasks, which keep the work needed on each trip visible. In the Trip Panel, add a task with a title, an optional description and a due date. It sits in To do until you tick it off, and then moves to Done, where it stays for reference. View tasks opens the Tasks panel, which lists the tasks across every trip and can be filtered by Urgent, 7 Days, 30 Days or No due date. When you mark a task as done in either place, it updates everywhere. Worth knowing: tasks added by an automation don't get a due date, so add one yourself or they'll sit under No due date.
Try it: Review View Tasks.
Hand repeatable admin to Wetu, so status changes, to-do lists and reminders happen on time without anyone needing to remember them.
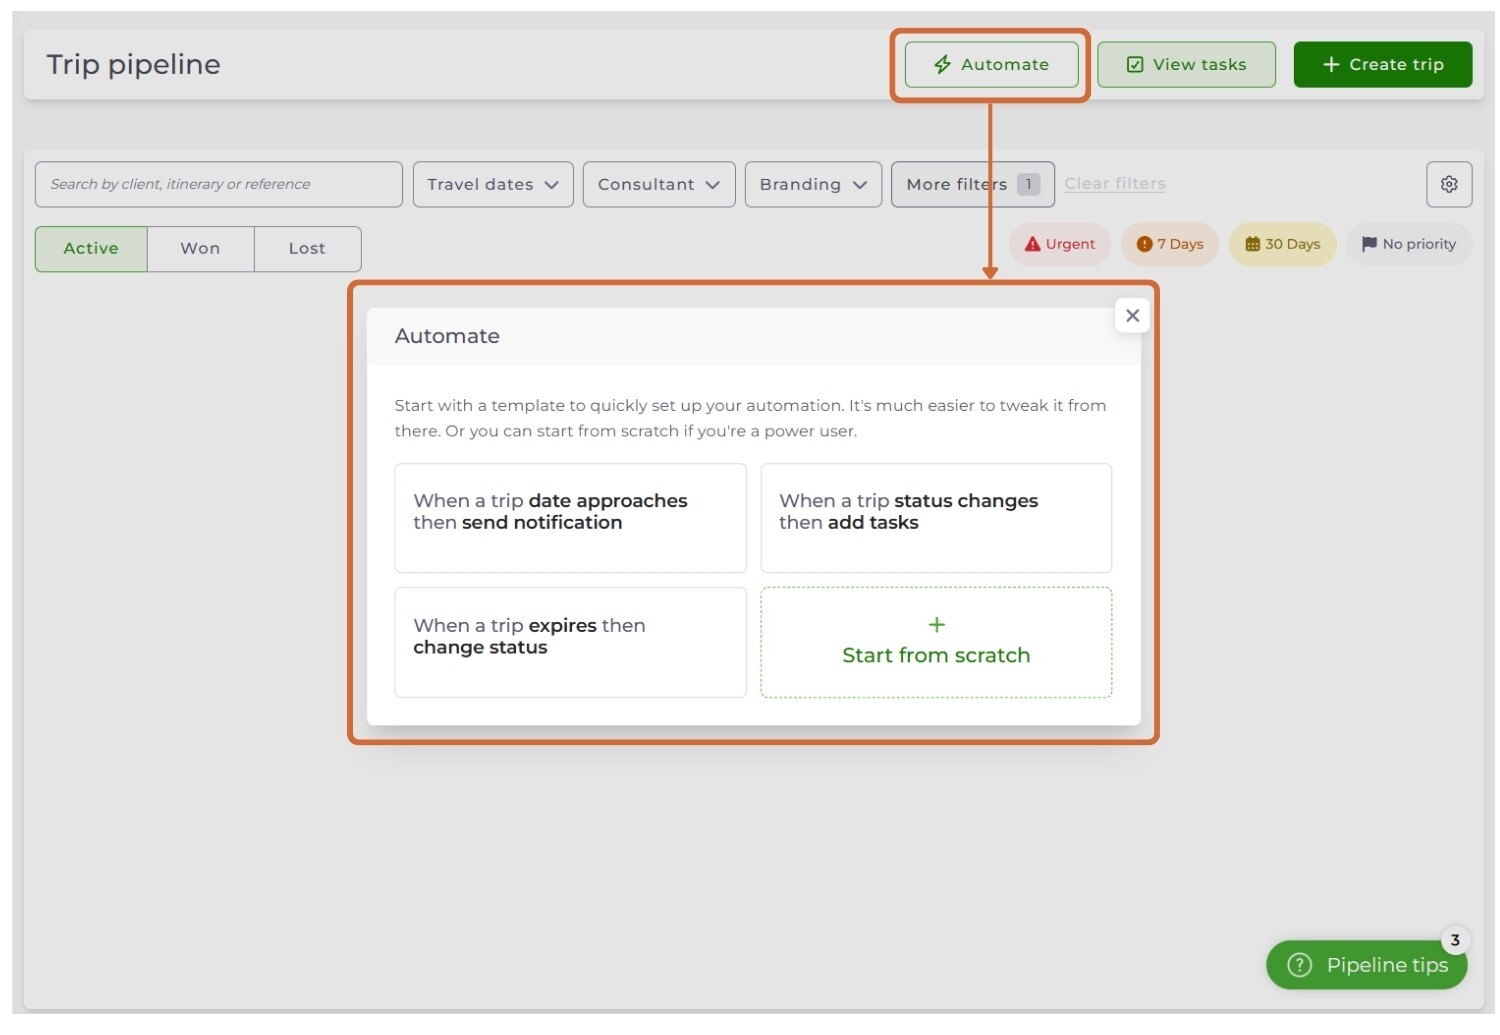
This topic covers how automations work. Admin users set up automations from the Automate button, and every automation follows one sentence: when something happens, on these trips, then do this. The trigger is either a trip being updated or a date approaching, which Wetu checks every 30 minutes. Conditions such as status, dates, trip owner, branding or PAX target the right trips, and every condition must be true for the automation to run. Actions can change the status, add tasks, mark all tasks as done or send an in-app notification. Automations that count down to a status change also colour the trip cards, so trips at risk stand out. One thing worth building into a habit: always add a Status is... condition, so an automation only runs on the trips you mean it to.
Try it: Select Automate and start an automation from scratch. Set the trigger, add a Status is... condition and one action, then save it. You need admin rights for this.
Start from proven workflows instead of designing every automation from scratch.
This topic covers the automations already set up in your account and how to build the most common workflows yourself. Your account comes with five automations: they move booked trips to Travelled once they end, send departure and task reminders, follow up on trips sitting in Payment due, and clear tasks on lost trips. Admin users can edit, switch off or delete them. Step-by-step examples show how to build a to-do list for each status, expiry deadlines, travel date moves and reminders. Notifications are in-app only, and tasks added by an automation don't get a due date. Worth knowing: each automation sends one reminder per trip, so set up one automation for each reminder point you need.
Try it: Review the preconfigured automations available in your account.
Complete the course. Earn your badge.
Share your feedback
Two minute survey